If you have a Cricut machine and want to explore the Slice feature, what it is, and how it works, you have come to the right place. In this guide, I will walk you through a simple project to help you understand “How to Slice on Cricut Design Space“.
The Slice feature lets you cut one shape out of another, helping you create custom designs with ease. It works by overlapping two or more shapes, selecting them together, and then clicking the Slice button.
For instance, you can create a crescent moon by slicing one circle out of another. After slicing, just delete the parts you don’t need and keep the shape you want. This blog covers everything you need to know about using the Slice feature. Let’s get started!
What Is the Slice Tool, and How Does It Work?
The Slice tool essentially acts like a cookie cutter, removing the overlapping areas of selected images or text. It allows you to cut one image out of another by removing the overlapping areas. You can use this tool to create custom shapes, cut letters into shapes, or add holes for layering.
Note: You need to select exactly two layers (images, text, or shapes) that are overlapping.
Steps to Use the Slice Tool in Cricut Design Space
Now, let’s learn “How to Slice on Cricut Design Space” using this simple guide to create custom shapes and layered designs easily.
Step 1: Click the Shapes Option
- First, you need to open Cricut Design Space.
- On the left-hand side, click on the Shapes option.
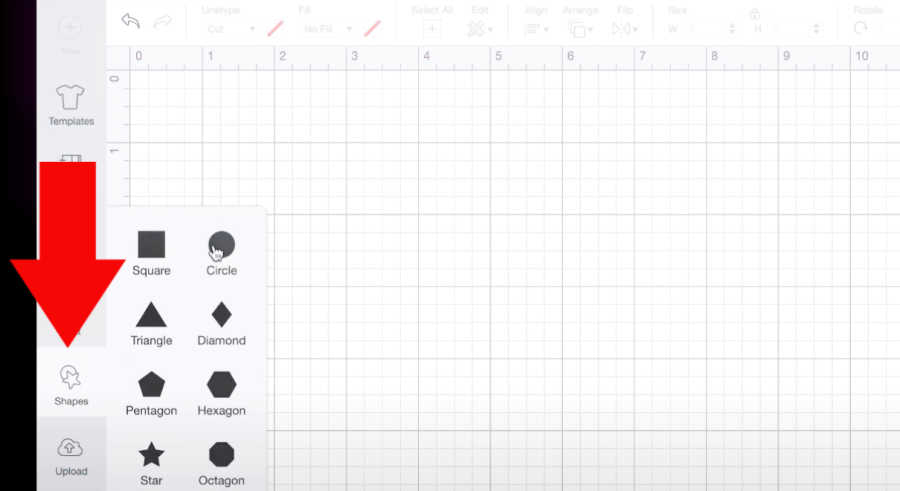
- Choose any image you want, such as a circle, square, rectangle, or star.
Step 2: Select Both Images
- Overlap the images you want to slice.
- Select both layers in the Layers panel or by drawing a selection box around them.
Step 3: Click on the Slice Tool
- Once you select the layers, the Slice option will be activated automatically.
- Click the Slice button located in the bottom right corner of the canvas on the desktop version.
On the tablet or mobile version, find it in the Actions menu.
Step 4: Remove Unwanted Parts
- Cricut Design Space will create new layers representing the sliced areas, and these can be seen in the Layers panel too.
- Select and delete the parts of the design that you no longer need.
- If you’re using a mobile device, tap and hold, then draw a selection box around the images.
- You might need to rearrange or resize the remaining pieces to get your desired final design.
For example, if you sliced a circle out of a square, you would delete the circle and the part of the square that was underneath it, leaving behind the square with a hole in it.
Tips & Tricks for Using the Slice Tool
Make sure to remember the following points before you learn how to Slice on Cricut:
- Always make sure you have only selected two layers before using the Slice tool, as it can slice only two layers at the same time.
- If you’re working with flattened objects, you’ll need to unflatten them before slicing. Select the object, go to Actions, and choose Unflatten.
- After unflattening, select the piece you want to slice and the piece it will be sliced from, then click Slice. Remember to re-flatten if needed after slicing.
- Make sure to delete the extra slice results (the parts of the shapes that were created by the slice but are not part of the final design).
- The Arrange tool can help bring layers to the front or back, especially when working with overlapping shapes and slices.
- For unwanted contours in your image, use the Contour tool to hide them.
Frequently Asked Questions (FAQs)
How to Split a Design on Cricut?
Follow these steps to split a design on Cricut:
- Insert a shape from the Shapes menu.
- Position the shape so that it overlaps the area of the image you want to separate.
- Select both your shapes and the image by clicking and dragging a box around them or by using the Layers panel. After that, click the Slice button.
- Now, Cricut Design Space will create several new layers.
- Delete the parts you don’t need.
Upload your image into Cricut Design Space and adjust its size and position on the canvas.
Why Is My Slice tool Not Working?
The Slice tool can be confusing; here are a few things to check:
- Ensure you only have two layers selected. If you have more than two, the Slice tool will be grayed out
- Ensure the layers you intend to slice are visible, not hidden in the Layers panel.
- Ensure there are no hidden or embedded objects within the layers you are trying to slice.
Note: If you’re trying to slice complex shapes, you may need to weld some layers together first to make them a single layer.
Why Won’t My Cricut Connecting to My Computer?
If your crafting machine isn’t connecting to your computer, you can try the following steps:
- Make sure your machine and computer are both powered on and within 10-15 feet of each other.
- If using Bluetooth, ensure it’s turned on and your machine is in discoverable mode.
- Make sure you have the latest version of Cricut Design Space.
- Unpair and re-pair it.
- Check if the Windows Firewall is blocking any kind of connection.
- Restart both your Cricut Machine and your computer.
How to Pair Cricut to Computer With Bluetooth?
If you want to pair your machine to your computer using Bluetooth, you need to follow the steps below:
- Open the Start Menu and Select Settings.
- After that, click on Devices.
- Then, please turn off your Bluetooth and then turn it on again.
- Click “Add Bluetooth or other devices,” then select “Bluetooth” from the options that appear.
- Let your device search for nearby devices.
- Select your Cricut Machine Model from the list provided.
- If prompted, enter “0000” as the PIN and click Connect.
- Now, you will see that your Cricut Machine will be connected to your computer.
How Do I Reset My Cricut Bluetooth Connection?
Learn How to Reset a Crafting Machine, try the Following Steps
- Go to your computer’s settings and delete Cricut as a Bluetooth device.
- Turn the Cricut Machine on, and in the Bluetooth settings, forget the machine.
- Unplug the machine, wait a minute, then plug it back in.
- Go to the Cricut Design Space app and machine setup to reconnect to the machine.
Why Can’t My Cricut Detect Sensor Marks?
A machine’s inability to read cut sensor marks can stem from various factors. These include improper mat placement, material defects (like wrinkles, smudges, or reflective surfaces), or issues with the machine itself. Ensure the following points:
- Calibration issues or even a need to clean the machine’s sensors can also be contributing factors.
- Strong lighting can reflect off glossy surfaces and confuse the sensor. Try closing the machine lid or reducing ambient light.
- Dust or debris on the sensors can affect their ability to read marks. Clean sensors using compressed air or a microfiber cloth.
How to Crop an Image in Cricut App?
Learn How to crop an image in Cricut Design Space, follow these steps:
- Insert the image into the canvas.
- Add a shape over the area you want to keep.
- Select both and click Slice.
- Delete the extras and use only the cropped piece.
Note: If your file isn’t an SVG, flatten it before slicing to ensure the system doesn’t treat it as a single object.
How to Setup My Cricut Machine?
Below are the major steps you can follow to set up your machine with a device.
- First, you should turn on the machine and keep it close to your PC or mobile phone.
- After that, connect both devices using the USB cable or Bluetooth connectivity.
- Next, you are required to download and install the Cricut Design Space app on your device.
- Once the download is complete, complete the sign-in process. (Create a new account if needed.)
- Then, choose the Cricut Machine Setup option to search for the Cricut Machine.
- Select the machine, and the setup will be successful; you can start using it.
How to Setup Cricut Explore Air 2 on iPhone?
Learn how to setup your machine on an iPhone, use these steps:
- To setup your Cricut machine to your iPhone, connect your devices via a connection.
- Choose from a USB or Bluetooth connection type.
- Now, install the software on your smartphone using the Play Store/App Store.
- Hit the Cricut Machine Setup button on your iPhone and get started with the setup process.