In today‘s competitive world, standing out is essential, and one of the most simple ways to do this is through customized business cards. Business cards play an important role in branding and marketing for any business. While many people order business cards from printing services, you can make your business card with a Cricut machine.
Cricut allows you to cut and design professional-looking cards that you can use for your business, whether you are a businessman or a freelancer. Let’s explore ‘how to make business cards on Cricut‘.
Materials Needed to Create Business Cards With Cricut
Before you start making your business card, you must gather all the required tools and materials. Having everything ready makes sure that your crafting process becomes easier and smoother and that you get professional-quality results. Read the below list of essential materials and tools that you need to start your custom business cards:
- Cutting machine of your choice, I am using the Maker 3 machine
- Cardstock
- Design Space
- Fine-point blade
- StandardGrip mat for thicker paper
- Scoring tool
- Glue
- Brayer tool
The Process to Create Business Cards on Cricut
Now that you have all your required supplies ready, it is time to get started with the fun part, which is how to make business cards on Cricut. Whether you are a beginner or an experienced crafter, these simple steps will guide you. Follow the below instructions:
Step 1: Create a Design for Your Card
In the very first step, you have to design business cards. Designing a business card is easy, and you can also find pre-made designs in the Cricut Design Space library. Follow the below steps:
- First, go to your system and open Cricut Design Space, then click on the New Project option to create a new project.
- From the left toolbar menu, click on the Shapes option.

- Choose a square, and it will appear on your empty canvas.
- Afterward, go to the top menu and click the Proportion to resize the card.
- When you have resized the card, you can change its color.
- Go to the Color Box on the top menu to change the card’s color.
- Now, add your company details, such as the number, name of the business, email ID, and logo.
- When you are done with all the details, select all the layers and then choose the Flatten option to make the image a single-layer one.

Note: The standard size of a business card is 3.5 inches by 2 inches or 8.9 centimeters by 5.1 centimeters.
Step 2: Select Your Material
Once you complete the design, it is time to print it and cut it. Follow the below steps:
- The first step is to hit the Make It option on the Cricut Design Space app in the upper right corner after making your design.
- Then, select the Project Copies option based on the number of cards you need, and then click on Apply.
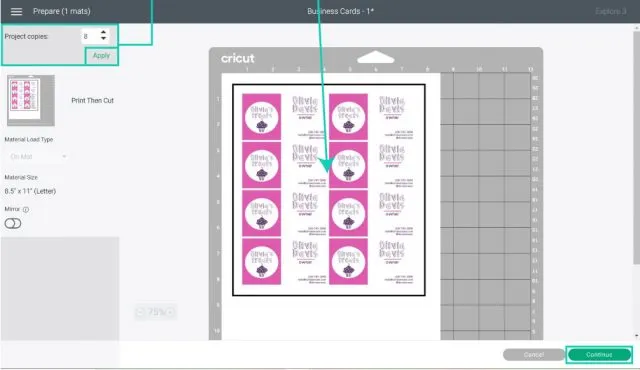
- Now, hit Continue and choose the material. Here, I will choose Cardstock as my option.
- Next, a preview window will appear where you can choose the Print option and your printer.
- After that, you will see an option to Send to the printer. Select it.
Step 3: Cut Your Design

The final step in how to make business cards on Cricut is one of the important parts. Follow the below steps:
- Next, place your cardstock on the StandardGrip mat and load it into your machine.
- Make sure to check if your design is the correct size before you place it on the mat for cutting. You can use a Brayer tool to put your paper on the mat.
- Use a Fine-point blade to cut out the design and hit the Go button to start cutting.
Step 4: Assemble Your Card
This is the last step of the project when your machine is done cutting out the business cards. You have to unload your mat, and if you feel there is an extra part that you need to remove, use a weeding tool. Then, separate the individual cards and use a punch machine to give round shapes to the corners of your card’s edges.
Conclusion
So, with the help of this blog on how to make business cards on Cricut, you have finally understood how easy it is to make any projects using this cutting machine. With a device like this, you can design unique business cards. You can either choose pre-made design templates or create your card from scratch.
Grab your crafting companion and start making creative business cards. By following the above guide, you can create a personalized card that will help you stand out from the crowd while saving money.
Frequently Asked Questions (FAQs)
Can I Add Any Special Effects to a Business Card On Cricut?
Yes, you can add effects to your business card with the Cricut machine. You can do foiling to make it shiny and give it a metallic look, and you can even emboss it to add detail to your car. Also, Cricut allows you to add scoring lines for unique folds, and with Cricut pens, you can add a hand-lettered effect to your business card.
What Materials Do I Need to Make Cricut Business Cards?
To make business cards with your crafting machine, you will need a few materials and tools. First, you will need a design software called Cricut Design Space to make a design. After designing, you will need a StandardGrip mat to cut out your design using heavy material like cardstock. You can use any smart cutting machine like Explore, Joy, and Maker 3 to cut it.
Can I Use Any Machine to Cut Cards?
Yes, cutting machines like Cricut Explore, Joy, or Maker 3 can be used to cut business cards. With the correct blade installed on your cutting machine, you can cut thick cardstock and get professional cards.