If you’re unfamiliar with making print stickers on Cricut, you’ve come to the right place! Let’s learn “how to print stickers on Cricut“ with this fun tutorial. You must download the Cricut Design Space on your device to create stickers. Creating stickers in Cricut Design Space is simple with the special “Print Then Cut” feature for Cricut Access subscribers.
Note: You can still preview the process by clicking “Make It,” but you won’t be able to use the Print Then Cut feature without an active subscription.
It might be frustrating to spend a lot of money buying pretty stickers when you can easily make them at home. So, let’s learn how to make them, as it will enhance your decorating skills and increase your creative journaling.
Materials for Creating Custom Stickers With Cricut
You must ensure that “Cricut printable sticker” materials are compatible only with inkjet printers. Avoid using the laser printer as it can damage the materials or the printer itself.
You need to have the following essentials before diving into the process of how to print stickers on Cricut:
- Cricut machine that is compatible with the Print Then Cut feature
- Soft scraper tool
- LightGrip machine mat
- Fine-point blade and housing
- Inkjet printer (capable of AirPrint/mobile printing from a mobile device).
- Item to enhance your stickers
Note: The Explore, Maker, and Joy Xtra machines support the ‘Print Then Cut feature‘. But, the Cricut Joy does not.
How to Print Stickers on Cricut: Simple and Easy Steps
Creating personalized stickers with a Cricut machine is fast and easy. To do so, you need to open the Cricut Design Space software on your device. After that, follow the instructions given below:
Step 1: Design Your Sticker
- Open the Cricut Design Space application and click on New Project.
- Upload your desired image from the Cricut Design Space library, or you can also upload your own.

- Choose an image on Canvas and click Complex to select the image type.
- For Windows, click on the Create Sticker button at the top of the edit bar.
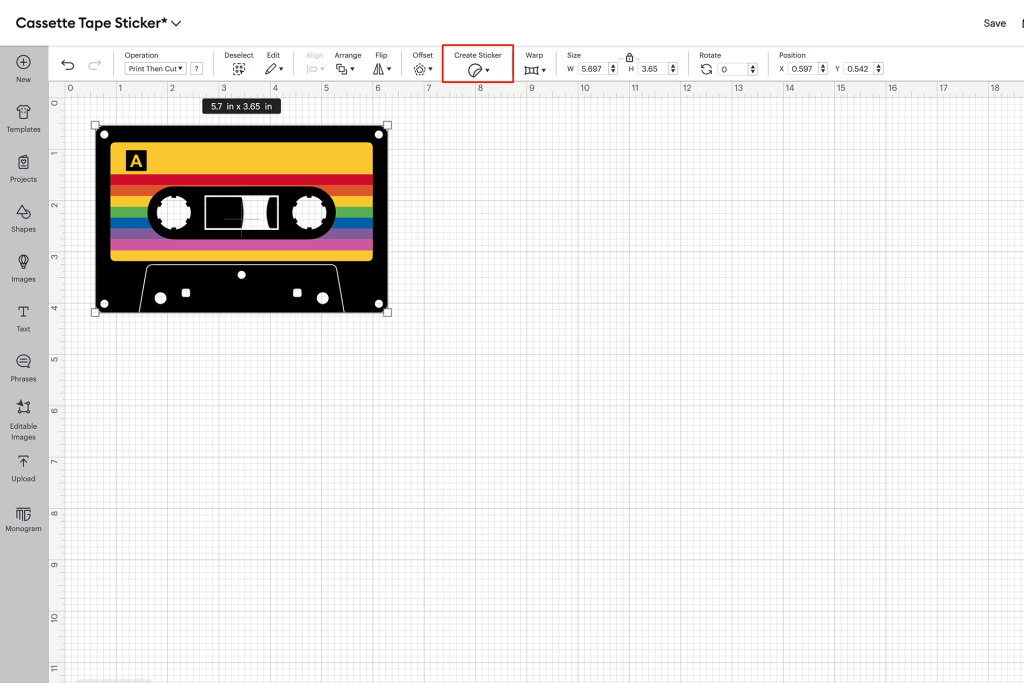
- For Mobile devices, choose the Edit option and then tap on the Create Sticker option.
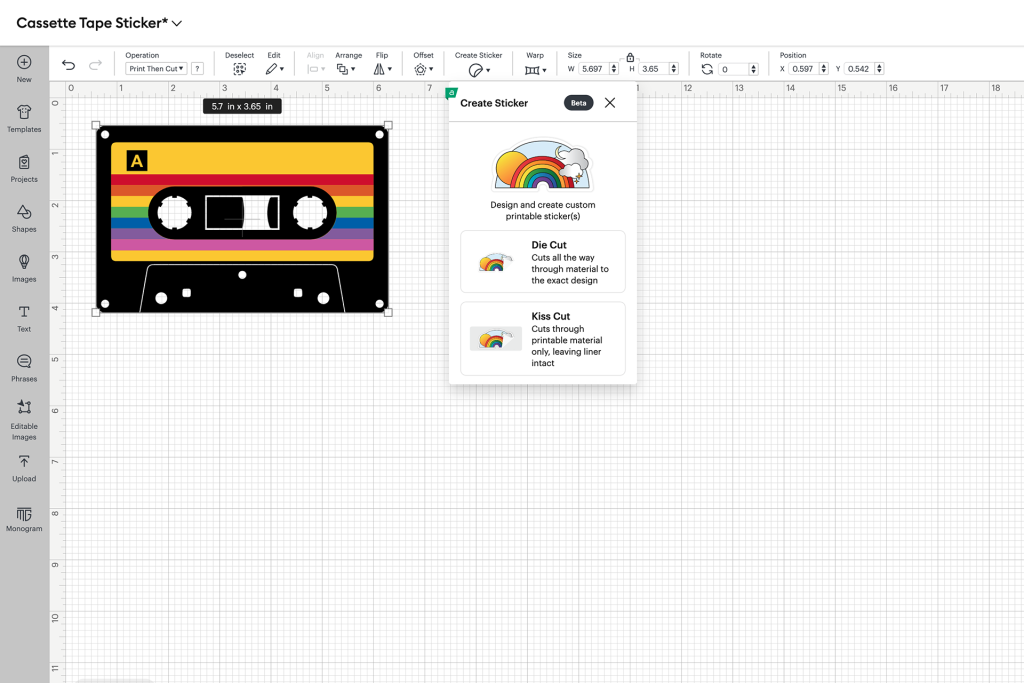
Step 2: Select Sticker Cut Type
- Now, your screen will ask you to choose your cut style. You can choose either die-cut or kiss-cut, depending on your convenience.
- Kiss Cut: It cuts through the vinyl but not the paper backing and leaves the paper backing intact, which makes it easy to peel off and apply. It is ideal for sticker sheets or printing on the paper backing.
- Die Cut: This method cuts through both the vinyl and the paper backing. It cuts a sticker into a custom shape that matches your design. It is ideal for unique designs or when you want to make a distinct, eye-catching sticker.
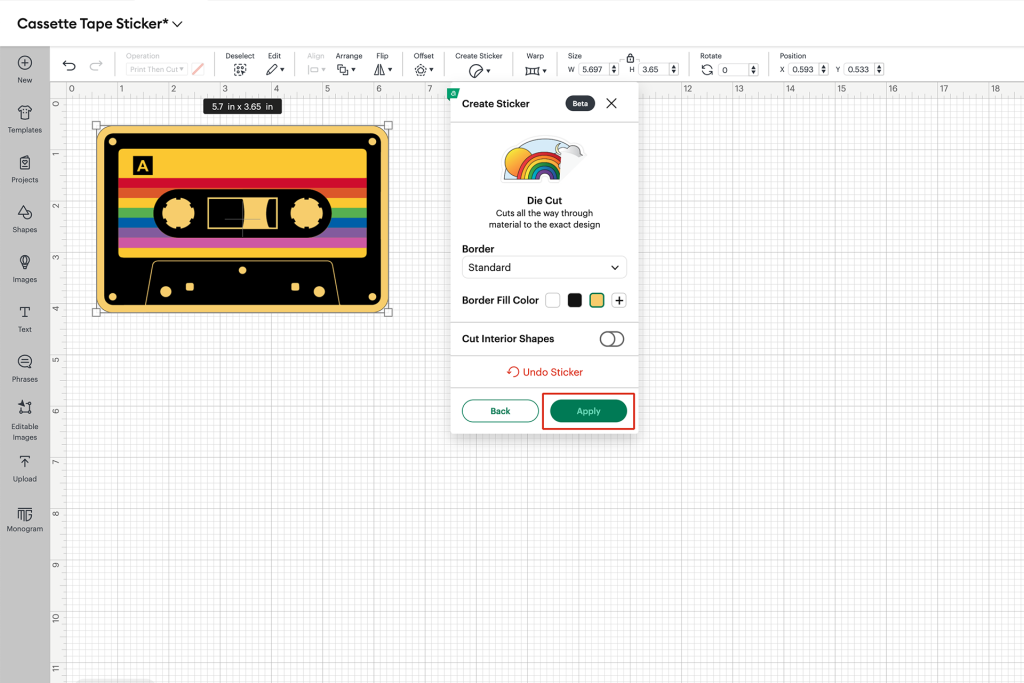
- Customize your sticker border’s color, thickness, and style.
If you have opted for Kiss Cut, you will get an option to add a Die-Cut Edge. This will add an easy-peel border that cuts all the way through the liner. That way, you can hand over an individual sticker to someone, and they will be able to peel it from the liner without any problem.
Step 3: Customize Appearance
- Modify border color, thickness, and style. Apply changes, then select “Apply” to finalize the design.
- If you have made any adjustments, locate the Create Sticker tool again. It will now be enabled as an “Edit Sticker.” Click on it.
Step 4: Using Print Then Cut
- Click Make It and follow the instructions in Cricut Design Space to print your sticker.
- If prompted, perform the Print Then Cut calibration using plain paper for accuracy.
- Use an inkjet printer to print the design(Cricut will auto-generate registration marks).
- In the Mat Preview, increase Project Copies if multiple stickers are needed.
Step 5: Open Material Settings
- On the Set Base Material screen,select “Browse All Materials.”
- Choose the correct sticker material type listed under the Compatible tab.
If you have a Cricut Explore Air 2 or an older model, first turn the Smart Set Dial to “Custom.”
Step 6: Load the Mat & Cut
- Carefully place the printed sticker sheet onto a LightGrip cutting mat, aligning the top left corner.
- Ensure the arrow next to the black registration marks faces up toward the Cricut.
- After that, you have to load the mat into the machine.
- Ensure that the page is oriented on the mat as it appears in Design Space.
- Press Go and let the magic happen. Your machine will scan for the Print Then Cut sensor markings and cut your design out precisely.
Step 7: Unload and Peel Stickers
- Once the cutting process is complete, press Unload on your machine.
- Ensure the application surface is clean and free of moisture or dust for optimal adhesion.
- Now, gently peel the sticker off the backing liner by hand and place it onto your desired surface.
You’ve now completed the full walkthrough! Learning Cricut sticker printing unlocks endless crafting possibilities.
Frequently Asked Questions (FAQs)
How to Use a Cricut without a Printer?
Yes, you can use a Cricut machine without a printer, but your project options will be limited if you want to print and cut designs. Cricut machines mainly cut materials like vinyl, paper, and fabric so that you can create projects without a printer. However, if you want to print designs before cutting (like for custom stickers or cards), you will need a printer connected to the crafting machine or a way to print elsewhere and then cut.
How long Does Cricut Vinyl last?
Cricut Permanent Vinyl is designed to last for up to three years, even in outdoor conditions. However, the actual lifespan can differ depending on factors like storage conditions, climate, and how well the vinyl is applied.
While vinyl can last for years when properly stored, it’s best to use it within a few years of purchase to ensure optimal performance.
What is the difference between a Cricut and a Printer?
The Cricut machine is a cutting machine, not a printer. It is designed for cutting and can use a variety of blades to cut different materials. They are often used to create personalized project items like decals, stickers, and cards.
Meanwhile, printers are designed to print text & images onto various materials, typically paper or fabric. They use ink or toner to deposit material onto the surface, creating the desired image or text. However, both can be used in conjunction with a printer through their “Print Then Cut“ feature.